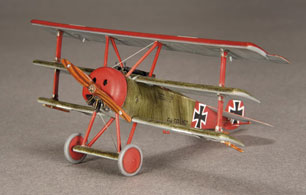
Eduard 1:72 FOKKER Dr. I - Kit #7015

Ok folks, after our mess up in Issue 133, here is the correct text for ‘Small but Perfectly Formed’, Eduard’s 1:72 Fokker Dr.I by Kevin Kuster… Apologies for any confusion caused.
I don’t know why I never had any interest in building smaller scaled planes. I guess like most builders, I have always just thought “bigger is better.” However, is bigger really better?
I have built and own several different sizes of the famous Fokker Dr. I (Revell’s 1:28, Roden’s 1:32 and Dragon’s 1:48, just to name a few) so why would anyone consider building Eduard’s tiny 1:72 kit? Until I took a closer look and realized how much detail can be put into such a small kit, I could not have answered that question.
The moment I began folding the photo etch parts for the cockpit, I realized this wasn’t going to be a ‘quickie’ build and I had underestimated this tiny giant. Once the photo-etch cockpit frame was assembled, I sprayed it with Tamiya primer for a good painting surface. The sidewalls of the cockpit were sprayed with Tamiya X57 Buff to represent the doped linen walls. All of the wood areas were masked off with Tamiya tape and sprayed with XF59 Desert Yellow and brushed with Burnt Sienna oil paint to represent wood grain. The pilot’s seat was sprayed with Gunze Sanyo No. 84 Red Mahogany and the seat belts were painted with a variety of Vallejo paints.
Once the cockpit was completed and the fuselage glued together, I began to contemplate my painting approach. Although I knew the moment of painting the green streaking on the plane would eventually come, I didn’t realize how much fear it would present to me. I knew I was going to use oil paints to create the streaking effect, however, I hate waiting for oils to dry and since I melted my last attempt with a space heater I was a little worried. (For those of you who subscribe to TMMI, you might have seen my previous melted Dr. I in issue #120.)
This time around I opted to use my wife’s food dehydrator and a grill thermometer to speed up the curing time. Although the instructions listed the drying time and temperature for bananas, pineapples and grapes, I didn’t see anything listed for oil paints and plastic models, so I thought a test was in order. (I wonder if the manufacture would consider buying this extremely important information from me to use the next time they print their instructions.) Using my trusty grill thermometer, I tested the dehydrator’s temperature gauge to ensure that it was accurate and would not get any hotter than the selected temperature.
Satisfied with my test, I sprayed the entire plane with XF57 and then painted on Windsor Newton’s olive green on all of the plane’s upper surfaces. As the oil paint sits on the acrylic it will begin to stain and darken the acrylic beneath it. I let the oil paint sit on the fuselage for about three to five minutes. Then, using an artists rake brush, began ‘raking off’ the unwanted oils by dragging the brush across the surface. (You can find a good artist’s rake brush at almost any quality artist’s supply store.) Wipe any paint “raked off” the brush onto a paper towel after each pass and repeat. (Good quality reference is important when creating this streaking effect and there are several wonderful books available on the Dr.I and the Red Baron.) Once I was satisfied with the look of the streaking, I set the dehydrator to 115? F, 46? C and let the parts cure over night. Even thought I tested my plan, I still had a restless night’s sleep and thought I could smell melted plastic the entire night.
The following day…Presto! Fully cured paint! After all of the undersurfaces were carefully sprayed with Gunze RLM 65 Light Blue, I attached parts B2, B3 and A6 to the fuselage. The upper wing, wing struts and tail were painted with Tamiya XF7 Flat Red and highlighted with Gunze H327 gloss red. Highlighting with a gloss paint of a similar color over flat paint creates a really nice highlight and simulation of the wing’s internal structure. The engine and machine guns were sprayed with Tamiya XF1 Flat Black and drybrushed with S&J silver powder. The prop was sprayed with Tamiya XF59 and the darker wood streaks were hand painted with Vallejo #983 (See issue #127 MEET THE FOKKER for complete step by step instructions.)
Since I wanted to create Richthofen’s 152/17 Dr. I, I needed to steal some of the decals from Eduard’s kit #7014 to complete my build. Not wanting to lose my gloss highlighting on the upper wing, I applied all of the decals directly to the flat paint without using any Future floor wax. Thankfully, I didn’t get any silvering on the decals and they adhered beautifully. Once all of the decals were applied and dry, I rigged the plane with .006 piano wire. Although the .006 piano wire might be a touch too big for this scale, I thought it looked acceptable.
Overall, I thoroughly enjoyed my first foray into 1:72 and have a brand new appreciation for the smaller scale. I guess good things can come in small packages.
Reference:
Fokker Dr. I Triplane
A World War One Legend
By: Paul Leaman
Richthofen
By: AE Ferko
Ghost The Greatest War
Aviation in World War One
By: Phillip MaKanna
Fokker Dr. I Number 98
Squadron/Signal publications
Osprey Fokker Dr. I Aces of W.W. I
By: Norman Franks & Greg Van Wyngardner